UNIT THREE


Relief Carving
The Plan
- wedge the clay
- roll clay and shape
- formed each turtle with layers
- finished with final details
- final smoothing of clay
I enjoyed learning a new technique for using clay. I used the additive technique to build up layers on my turtles. I used tools to undercut and separate the background from the turtles.
I chose to create another relief piece to practice the technique.


Sgrafito
The Plan
- shaped into circular shape
- applied the underglaze
- scratched the flower design to reveal the surface below
This was a simple and effective technique. I enjoyed its simplicity and the scratching technique that is used in the design. I liked the process so much, I made two sgraffito pieces. The second one had a mountain and sky design. I would definitely like to try this type of clay work again.

Slump Mold
The Plan
- wedge the clay
- roll the clay to create plate shape
- draped clay over the slump mold to create plate convex
- trim and finish
- jellyfish/ocean design using underglaze
This was another enjoyable technique, it is fairly simple and you can create great pieces using this technique. It is a good way to make bigger clay plates or shallow bowls.
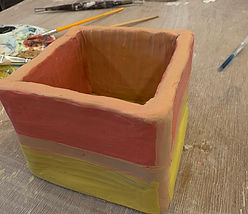
Orange and Yellow 1956 by Mark Rothko
The plan
- Wedge the clay
- Put through the flattener
-Cut out squares
- Attach the squares one by one
-Smooth it out
-Paint squares

I really liked making all of these boxes I made 2. And decided to turn one of them into my final project last minute. Because it was already fired. So I painted both of them as my final just in case.I choose this artist because I'm drawn to the challenge of making its emotional depth. And color fields into a three-dimensional form. His simplicity of art is what also really intrigued me.